Bitmap and Indexed Images
This post is for all the students in the lab group I supervise at the University of Abertay Dundee. We are currently teaching them how to draw sprites on the Game Boy Advance. The GBA has support for an indexed frame buffer (under display mode 4). In this post I explain the difference between bitmap images and indexed images, and provide a quick step-by-step guide to converting a bitmap image into an indexed image using Adobe Photoshop.
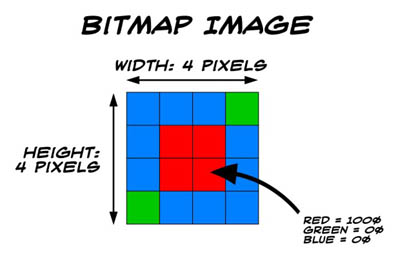
There are many ways that an image can be represented on a computer. You are probably already familiar with a “bitmap” image. A bitmap image is represented as a 2-dimensional array of colour values, where each element in the array is known as a “pixel”. It is worth noting that a “pixel” doesn’t have to hold a colour value, as you will discover later on in this article. The following diagram shows a bitmap image in more detail:

Although modern-day games consoles and computers have native support for bitmap images, devices with smaller memory capacities (such as the GBA) do not, as they do not possess enough memory to store a bitmap image. Another image representation technique is therefore employed, known as “Indexed Images”, which trades image quality for storage space.
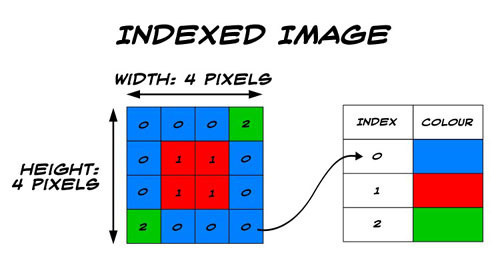
Instead of storing a colour value for each pixel, an “Indexed Image” will store a zero-based index into a one-dimensional array of colour values known as a “palette”. The following diagram shows this more clearly:

The GBA has native support for 8-bit indexed images. This means that each pixel is represented by an unsigned 8-bit number. As an 8-bit number can represent 256 unique integers, the palette can therefore hold a maximum of 256 colours.
The majority of the tools used to convert images into source files that can be cross-compiled into your GBA programs require you to specify an “indexed” image, as opposed to a “bitmap” image. As many of you are creating your own sprites as bitmap images, the following steps can be taken to convert a bitmap image into an indexed image using Adobe Photoshop:
- Load photoshop
- Open the file you wish to convert
- From the “Image” menu, select “Mode -> Indexed Color…”
-
A dialog box will appear:
- An 8-bit indexed image supports a maximum of 256 unique colours so specify ‘256’ in the “Colours” field of the “Palette” options
- Uncheck the ”Transparency” box
- Set the “Forced” option to “None” - this will allow us to use all 256 colours in the palette
- After setting these options, hit OK
-
The image is now an indexed image, but we still need to save it as an indexed image file. To do this:
- From the “File” menu, select “Save As” and select “BMP” for the format (the BMP format supports both bitmap and indexed images)
- When you are happy with the file name and location, hit the “Save” button
- A “BMP Options” dialog box will be displayed. Select “Windows” for the “File Format” option, and make sure “Compress” and “Flip row order” are not checked.
- Finally, hit OK
Following the above steps will allow you to produce indexed images that you can use with the GBA.
Above, I mentioned that an indexed image trades image quality for storage space. A loss in image quality will occur when the original image has a greater amount of unique colours than the palette can hold. When there is no more space left in the palette for new colours, Photoshop will choose the palette entry that is closest to the original colour. But sometimes this new colour is noticibly different from the old colour, and will therefore produce a visual error.